Brands: a well-managed growth driver
Store Commander, the key tool for managing your brands' performance
Why Are Brands Important for your shop?
✅ Build Customer Trust
Well-known brands reassure buyers:
They are synonymous with quality, reliability, and expertise
Customers often already have experience or familiarity with the brand
➡️ Result: higher conversion rates and fewer hesitations before purchase.
🔎 Make Navigation and Search Easier
PrestaShop allows you to display a dedicated page for each brand:
Visitors can filter by manufacturer
They quickly access all products from the same brand
➡️ Improved user experience and smoother browsing.
📈 Boost SEO Performance
Each brand can have:
A SEO-optimized brand page
Original content (description, visuals, internal links)
➡️ Helps attract more qualified organic traffic from search engines.
🎯 Segment Your Offer and Marketing Campaigns
Linking products to brands lets you:
Target specific customer segments via email or advertising
Create brand-specific promotions or landing pages
➡️ More relevant marketing, more sales.
🛠️ Better Catalog Organization
Clear product structure
Ability to analyze performance by brand
Adding a new manufacturer to your store
There is a interface dedicated to manufacturers in Sc interface, accessible under the main menu Catalog > Manufacturers
This is where you can add new manufacturers by clicking the + icon on the toolbar.
The new line is created, at the end of the list, and you can edit it to insert the name.

You can then add any other information by switching the central view to the Large and the SEO view. You can also add a logo and a description via the property column.

Note that all of Sc default options are available in this interface, such as filtring, sorting, copying/pasting as well as mass association (to products).
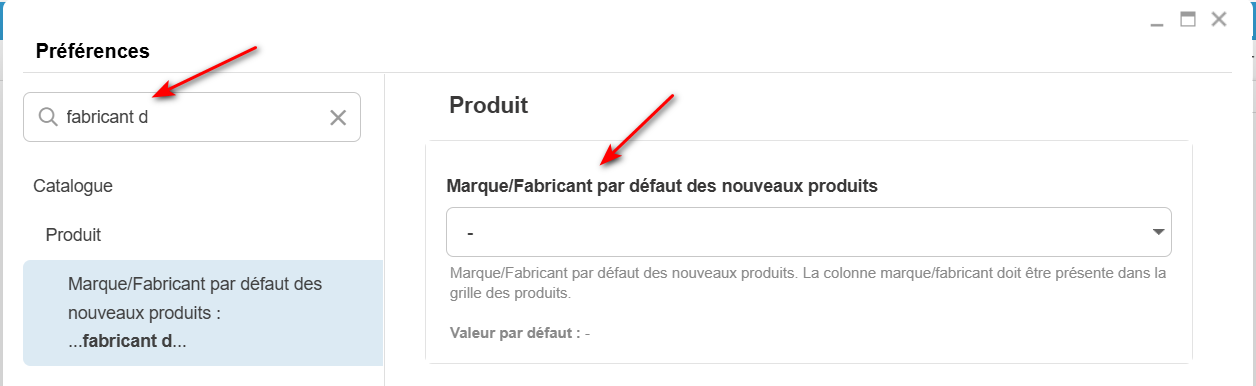
Setting a default manufacturer on new products
There’s an option in Sc Settings where you can set a manufacturer that will be automatically associated to all new products you’ll be creating on your shop via Store Commander - interface or csv import.
You’ll find this option under Tools > Settings - select the name from the list
Associating a manufacturer to multiple products
You’ll find the Manufacturer field in Sc interface, in the Large view by default (but you can add it in any views with the interface customization tool.
If a brand is set on a product, it’ll be displayed in that column.
To associate a manufacturer to a product, simply double click the cell to show the list of available manufacturers in your shop, and select it.
If the same manufacturer needs to be associated to multiple products, no need to edit each product, but use the copy/paste option.
Right click the name of the manufacturer already set on a product and select ‘copy’
Then select all other products requiring that same name, right click and select ‘paste’.
And you’re done 🤩


If you need to dissociate, you can apply the same method, but you’ll be selecting the “ - “ at the end of the list in the drop down menu

Optimizing manufacturer information
If you are adding a Brands page on your site, you can complete all necessay information on all the manufacturers within Sc and it’s dedicated interface, or using the csv import tools also dedicated to manufacturers.
The tool is under Catalog > Manufacturers > CSV Import.
The point the most important when importing is the identifier, which is used to find the manufacturer to update.
There are only 2 choices: id_manufacturer and name

This identifier is a key point, as it must be unique if the import process is to modify the correct manufacturer.
The second part of the configuration: choosing the actions
In this example, we’re aiming at updating description based on the existing manufacturer ID.
Therefore the actions to choose are ‘skip’ + ‘modify’

Informations to modify: the mapping
The section called ‘mapping’ allows you to first choose the identifier selected for your import, as well as the information you want this import to modify.
All fields mapped and ticked will be taken into account during the import.
Here, we want to update the description only, based on the manufacturer IDs.

You can name and save the mapping, to reuse it later on with another description update file.
Importing the data
The very last step is to adapt the number of lines to import in the ‘Process’ panel.
500 is set by default:
- if your file contains less than 500 lines, you can keep 500.
- if your file contains more than 500 lines, modify the value
Do note that it’s not necessary to enter the exact number of line, as long as it’s above, it’s fine.
And finally, start your import by clicking on the corresponding icon:

💡Dynamic segmentation
Do you have a catalog with many brands? Don't panic, thanks to the Segmentation tool (included in premium subscriptions) you'll be able to automatically segment your products by brand.
Indeed, you can have a segment per brand in your Sc interface that will include the products associated. So very useful 🤩
Segmentation is accessible in Tools menu.
Click the ➕ to add the new segment, choose the Dynamic Type, name it, and validate

Then select the ‘products by manufacturer’

You also have additional options to filter even more your segment

There you go, back to Sc interface, you’ll see all segments by manufacturer, with corresponding products within.

How to manage the brand page
In PrestaShop, there is an important difference between the brand (or manufacturer) page and a category. Both allow you to view products, but they have different purposes and behaviours.
Each product page can be associated with a single brand.
PrestaShop automatically generates a page for each brand (e.g. yourwebsite.com/3_nike).
This page displays all products related to that brand.
You can also display the logo, description and sometimes a link to the manufacturer's website.